

TB mega menu implementation with a demonstration (Part 2)
In the first part of this blog, we had completed the installation and had also created blocks for custom block types. In this part, we will see how to configure the TB mega menu so that we can get the structure of the menu ready as per our design.
Configuring the TB mega menu and placing the TB mega menu block in a region are two separate things.
The TB mega menu can be configured for an existing menu. So, you need to ensure that you have a complete hierarchy of menu ready before you begin the configuration. However, you can modify the links later on from the TB mega menu configuration page.
Defining a menu structure
If you already have a menu that you want to use then you are already a step ahead! If not, then go to /admin/structure/menu and click on the Add menu. Create the menu as you normally would.
For demonstration purposes, we will be using the below menu structure. Let the name of this menu be Example menu:
Parent 1
-Child (1)
-Child (1) content
-Child (2)
-Child (2) content
-Sub child (1)
-Sub child (1) content (This content will be displayed over the child (2) content)
-Sub child (2)
-Sub child (2) content (This content will be displayed over the child (2) content)
-Child (3)
-Child (4)
Parent 2
-Child (1)
-Child (2)
-Sub child (1)
-Sub child (1) content (This content will be displayed over the child (2) content)
-Sub child (2)
-Sub child (2) content (This content will be displayed over the child (2) content)
-Child (3)
Parent 3
-Child (1)
-Child (2)
-Child (3)
Implementation
Now that we have a clear idea of how we want our menu to look like we can start implementing the TB mega menu.
Before we do so, one thing we had noticed earlier is that there were contents embedded in the menu itself for certain menu items. The contents include:
-
Title
-
Image
-
Description
Some of the block contents had all of the above fields while some of the block contents may only have the title and description. Also, we need another content which would have neither of the above. We would come to this part later on.
Since we know what the hierarchy of the menu is and what content the menu items need to have let us create these contents first so that we have the block ready (more on this later) when we start configuring the menu.
The contents we have for the menu items are rendered via a block. These blocks will be later on placed while configuring the menu.
Flashback time
Let’s rewind time! Earlier we had created a block type with certain fields. These fields were left on the user to create as it is a pretty straight forward process. For this demonstration purpose let us create the following fields for our block type.
-
To create fields for the block type, go to admin/structure/block-types and click on Add block type. Specify the Label and a description. Once done, click on Save block type.
-
Next, you will be taken to the block type listing page which is /admin/structure/block-types. On this page you will have the option to Manage fields. You can add, edit or delete the fields for the particular block type from here.
-
Once you click on the Manage fields option, you will be redirected to a page wherein you will be able to add or modify the fields.
-
Initially you will have the following fields present by default:
-
Label: this field corresponds to the name of the block.
-
Title: this field corresponds to the title of the block.
-
View mode: this field corresponds to the view mode of the bean.
-
Revision settings: this field corresponds to the revision of the block.
-
Note: these fields are provided by the bean module itself.
-
Add the following fields by specifying a label and selecting the type:
-
Menu item image:
-
Label: Menu item image
-
Field type: Image
-
Widget: Image
-
-
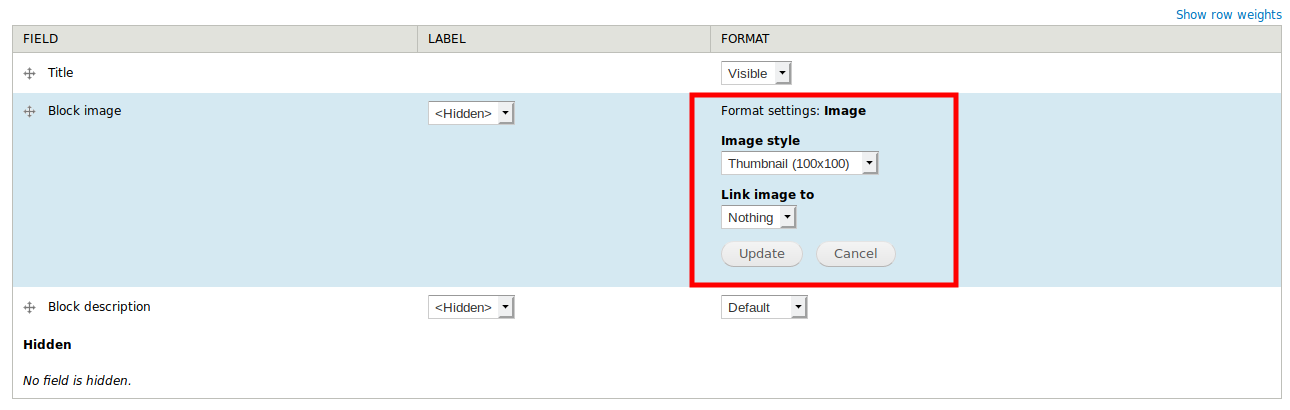
You can add an image style to this field by going to the Manage display tab. Over there, click on the gear icon to the extreme right of this image field.
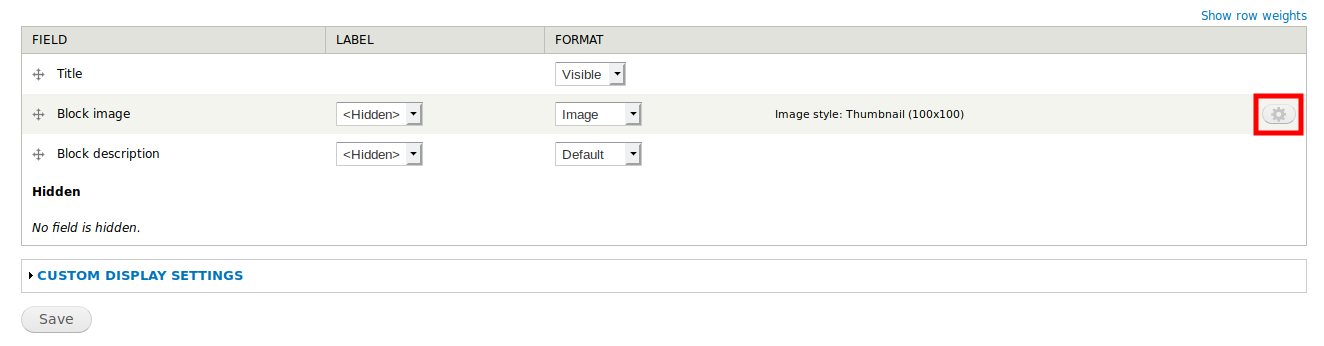
Once you do so, further configuration options will open. You will see an option to provide an Image style. Click on it and select the image style you want. Additionally, you can link this image to the content or the file. To do so, click on the Link image to option and select the desired option from the dropdown menu. Once done, click on Update and save the block type.
-
-
Menu item description:
-
Label: Menu item description
-
Field type: Long text
-
Widget: Text area (multiple rows)
-
-
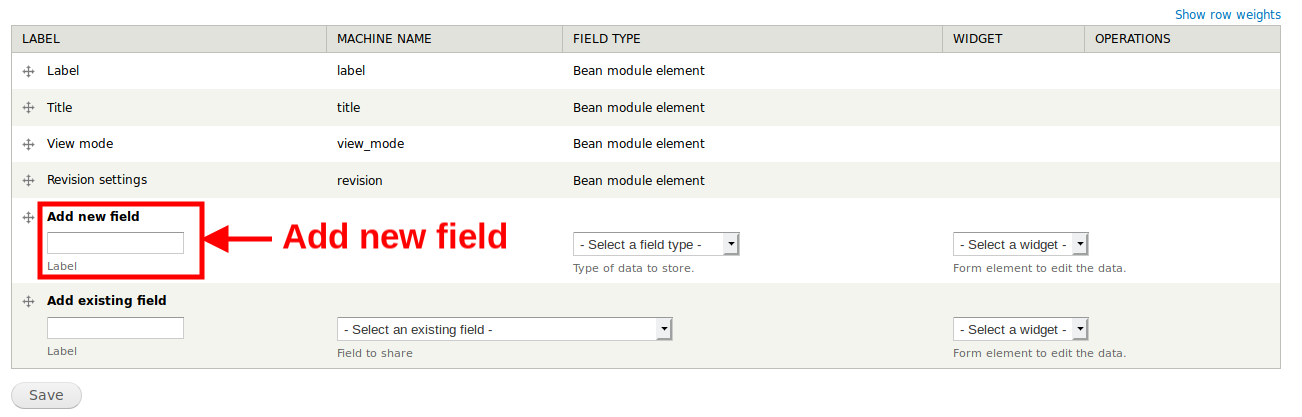
The below image shows where you can create a field.
-
Once done, save it and you will have your block type ready with the fields.
-
Now you are ready to create the content for the block.
Creating content for the blocks
-
To create the content for a menu item, go to /block/add/menu-item-content-block
-
Fill out the below fields:
-
Label: This is a mandatory field. This field corresponds to the blocks name i.e. this is the name of the block.
-
Menu item image: This is an optional field. If we want to have an image in the content then that needs to be inserted here. On clicking browse, the media browser opens from where we can select the image file from our local storage or that residing on the server itself.
-
Title: This refers to the title of the content.
-
View Mode: This is a mandatory field. This field provides the default view mode for the bean. It would have a default option selected. Leave it as it is. This does not need to be modified.
-
Menu item description: This refers to the description of the content.
-
After the necessary information has been filled up, save the block.
-
-
Now, the content for a particular menu item has been created as a block. Similarly, we can create blocks for other menu items. There can be a case where a particular menu item does not have an image. It only has a title, description and a link. In such a case, while creating the contents in the block as we did above, leave out the Menu item image blank i.e. without uploading anything in it. For another case, we would also require a common empty block, which would have nothing other than the block label. I will address this later on as where we exactly need it.
Now that we have the content ready we can start configuring the TB mega menu.
Configuring the TB mega menu
Initial configuration
-
To configure the TB mega menu go to /admin/structure/tb-megamenu.
-
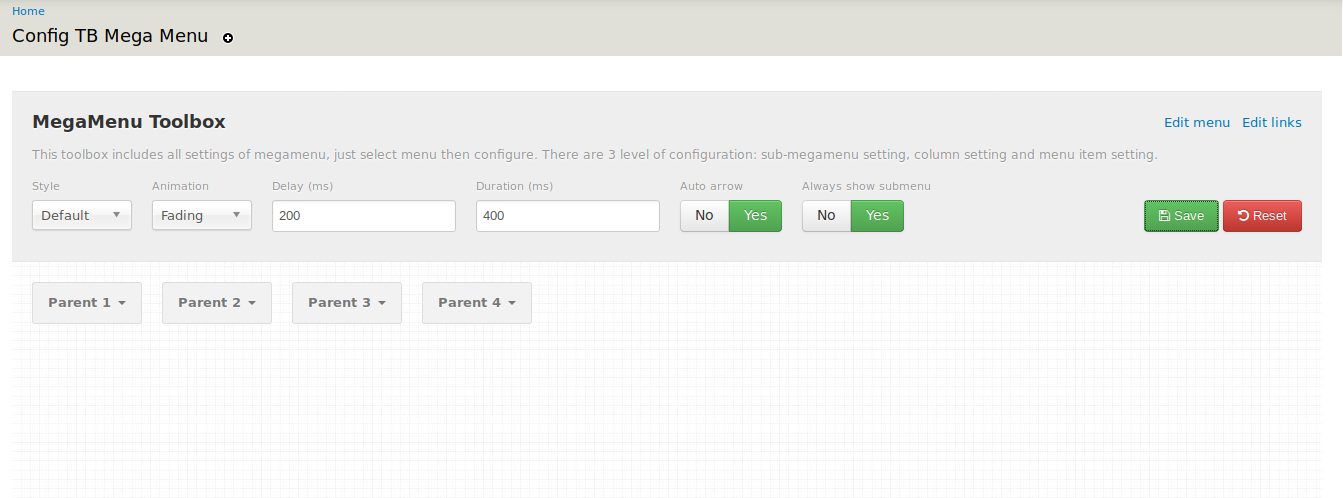
Click on the config link for the menu that you want to be displayed.
-
A page like the one below would open.
-
This lists the 1st tier of menu items which we are referring to as the Parent menu item links with some options. The options include:
-
Style: leave it as default.
-
Animation: this might be selected as none. Change it to fading or some other animation style. This is because if no animation is selected then all the menu item contents would appear one above another and not only on hover, which is not what we want.
-
Delay (ms): specify an animation delay as required.
-
Duration (ms): specify an animation duration as required.
-
Auto arrow: to hide the arrows next to items that have a submenu.
-
Always show submenu: collapse submenus when browsing on small screens.
-
-
This is all that we need to configure for the initial items visible when this page loads for the 1st tier (Parent) menu items.
-
Now, let us move inside these links.
Creating child menu links
-
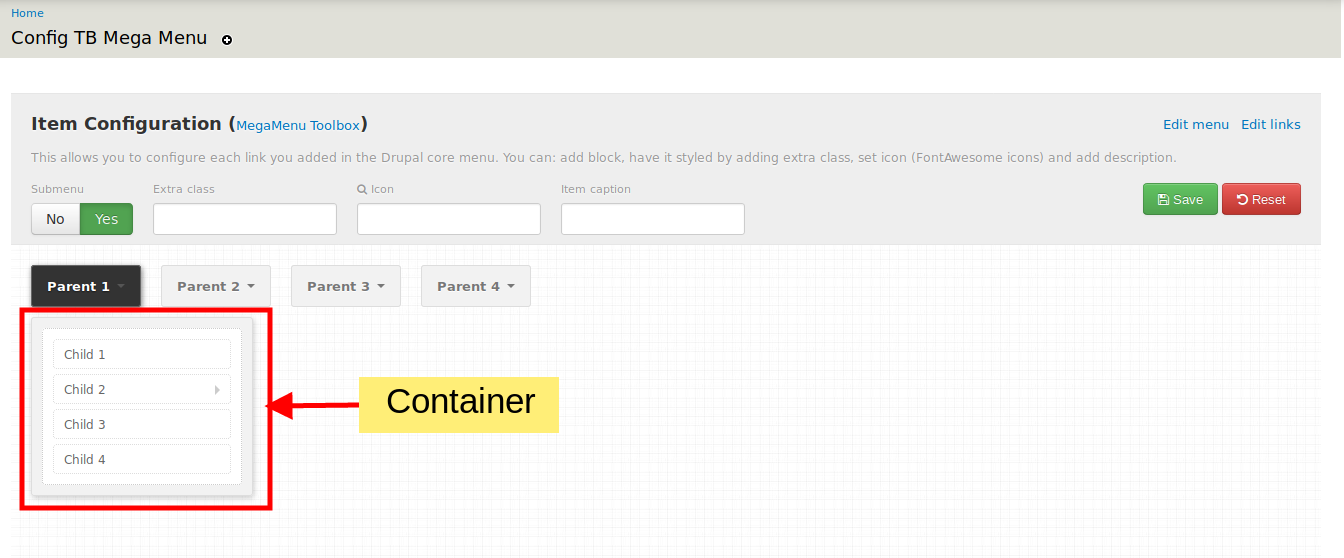
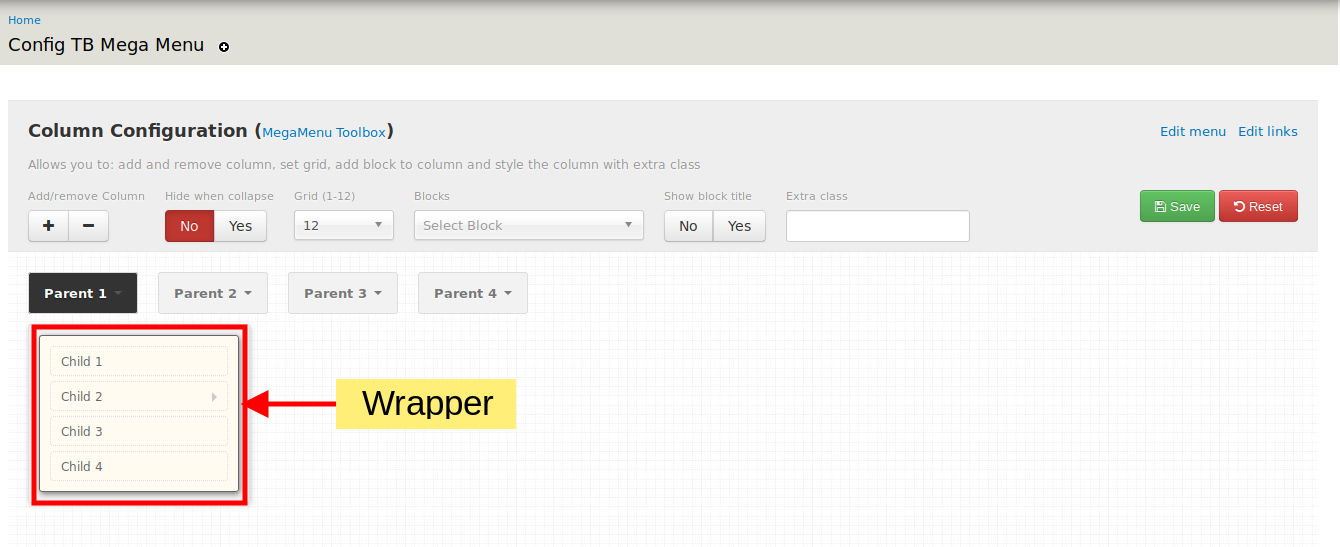
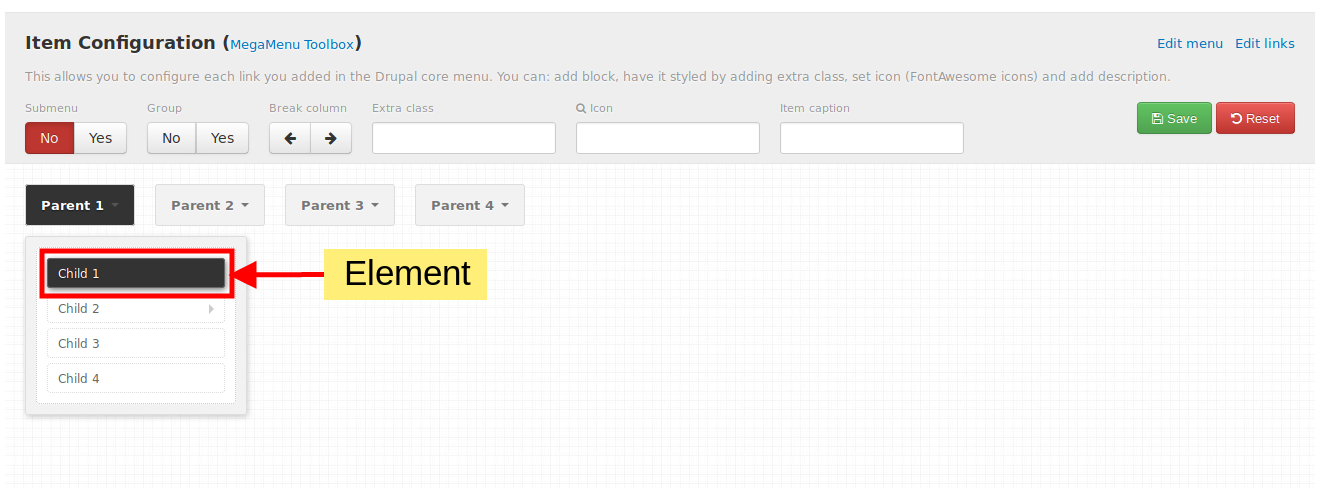
Each of the child menu links is wrapped in containers. Let us name them for ease of use:
-
Let us call the box that contains all the elements as the Container.
-
Let us call the box that contains the elements directly as the Wrapper.
-
Let us call the menu items as Elements.
-
-
A visual representation will better support the explanation:
-
Container.
-
-
Wrapper.
-
Element.
-
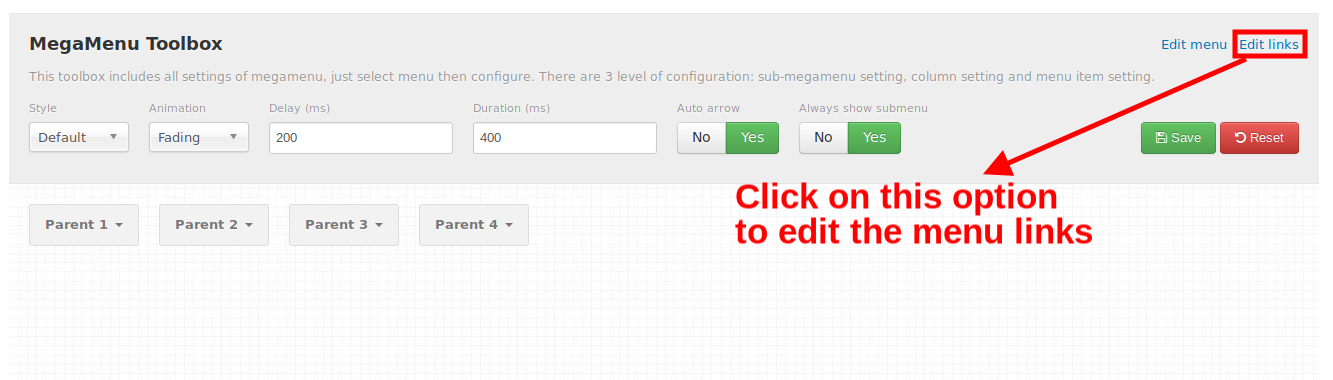
If there is a need to modify a certain menu link then that can be done by clicking on the Edit Links option on the right-hand corner of the page. This will redirect you to the menu link configuration page. Let us see below where it is
Add content to child (1)
-
Click on Parent 1.
-
Click on the first Element which is the child (1).
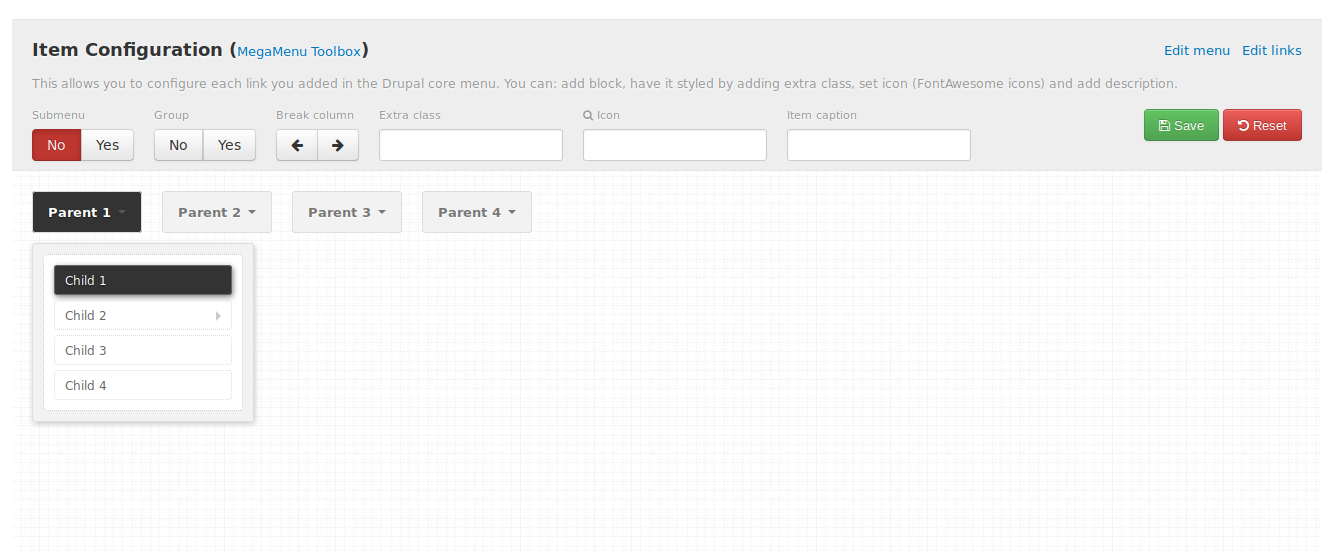
-
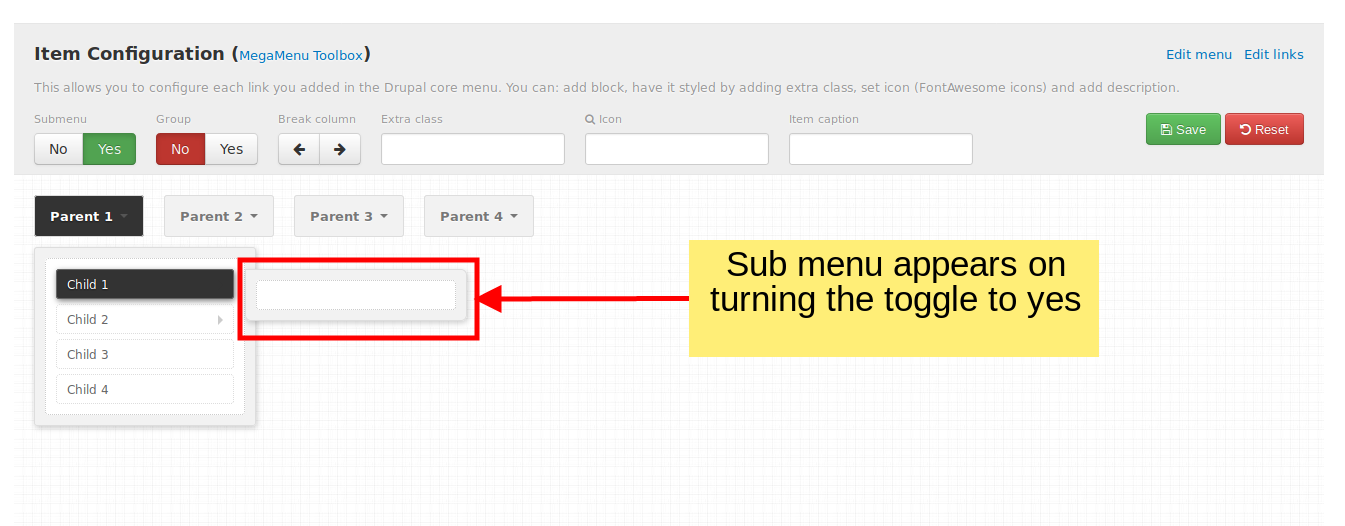
You will be able to see the option of Sub menu above. The value will be set as No. Toggle this option to Yes and a submenu for the child (1) will appear.
-
Note: This submenu does not correspond to menu item links i.e. this is not for displaying a child menu link or any menu link to be precise. This submenu is for placing the content as a block. Menu items which have child menus will automatically appear under the respective menu items as they have been configured in /admin/structure/menu or by going into Edit Links as discussed above.
-
We had earlier created a content for this which we would be placed as a block here. To do so, now you have to click on the submenu Element.
-
Then click on the option which says Blocks: Select Block.
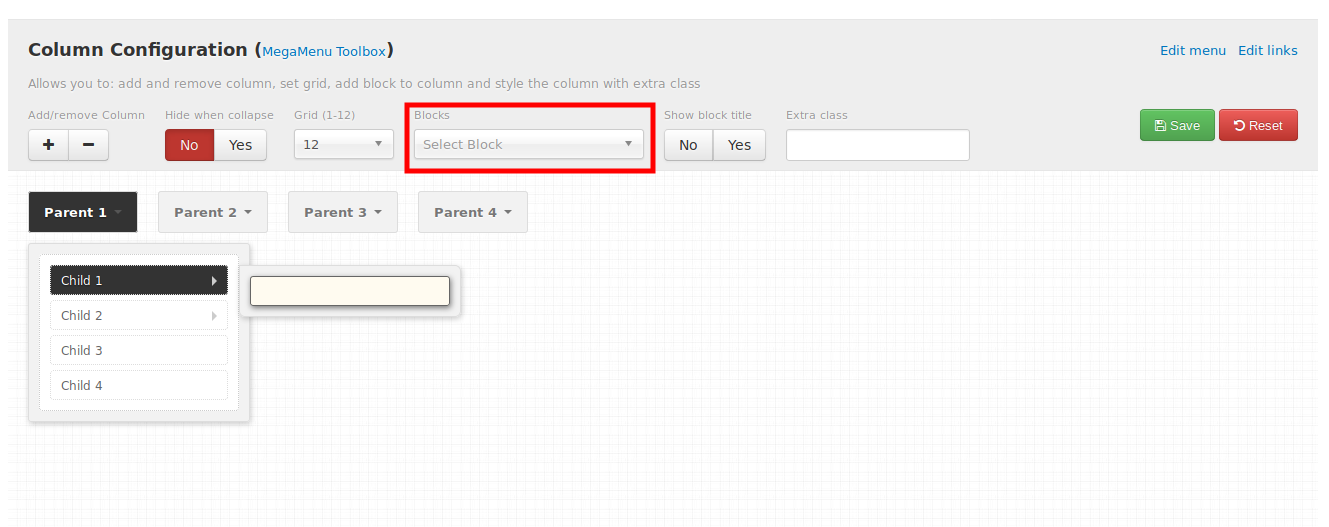
-
On doing so a drop down will appear with all the blocks.
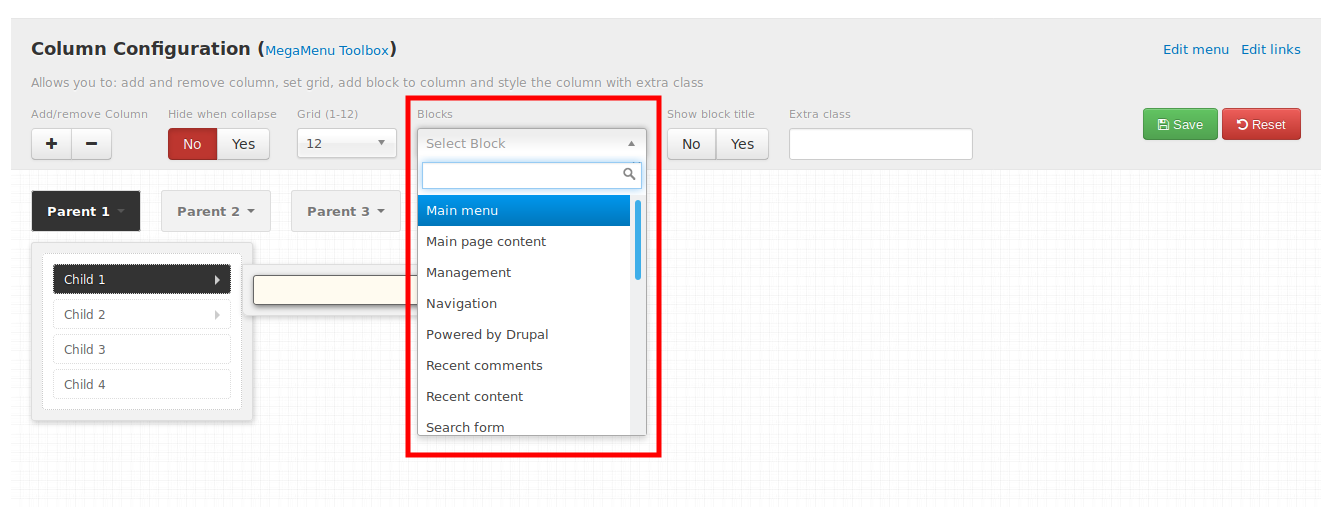
-
Select the block which has the content for this child menu item.
-
In doing so the content will appear and look something like this:
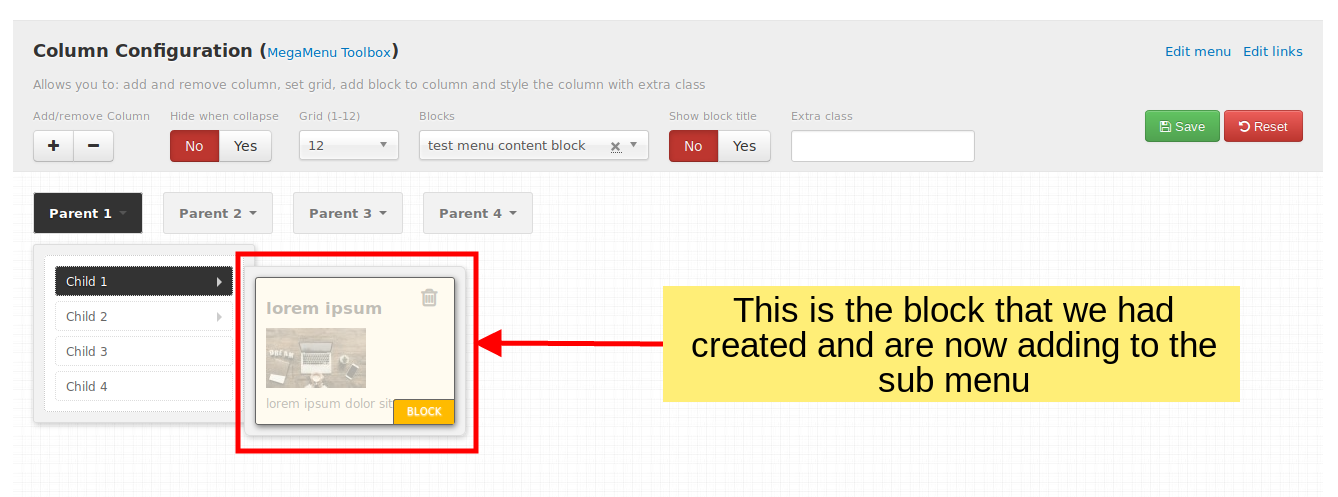
-
Do not worry if the design seems to break. This is just the configuration page and the design can be handled entirely through the CSS.
-
Hence we have created content for a child menu.
Add content & submenu to the child (2)
Our design had a child (2) menu item which had two submenu links as well as content. This is a bit tricky. The functionality we sought was that:
-
Hovering on the child (2) would display:
-
The submenu links.
-
The content for the child (2).
-
-
Hovering on the submenu link for the child (2) would display:
-
The content for the submenu links instead of the child (2) content, also for the second child menu link.
-
Let us see how we can achieve this.
-
As per our menu structure, on clicking on the child (2) Element a sub menu link should appear.
-
According to our design, the content should be placed just beside the submenu link for the child (2).
-
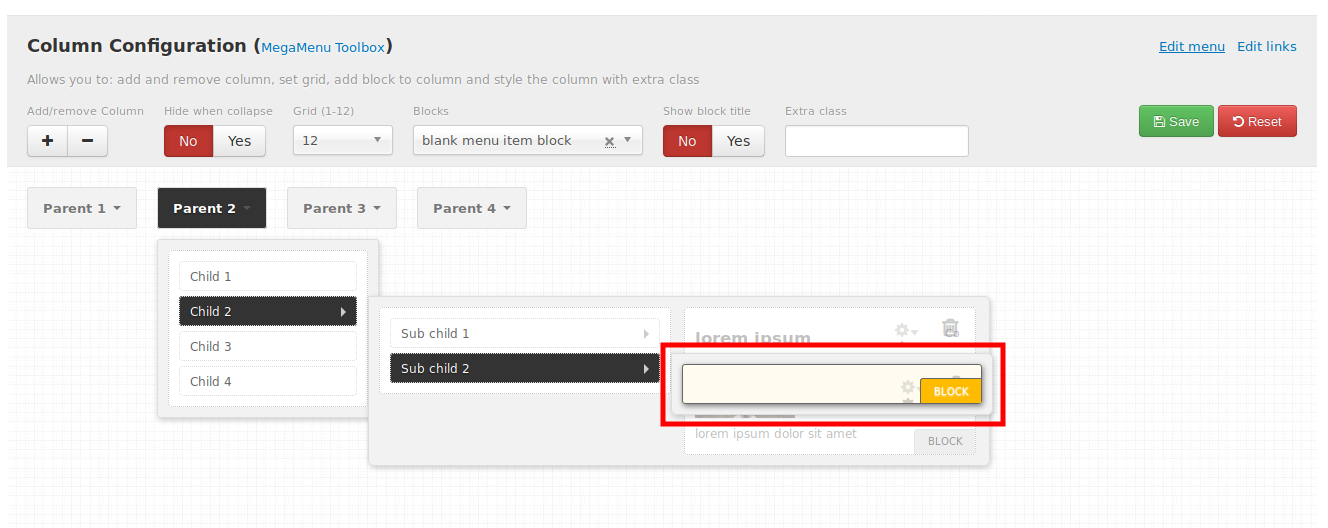
To do so, select the Wrapper of the submenu link and an option will appear which says Add/remove Column.
-
Click on the “+” sign for the Add/remove Column to add a column beside it.
-
On doing so a column will be added beside the menu item link.
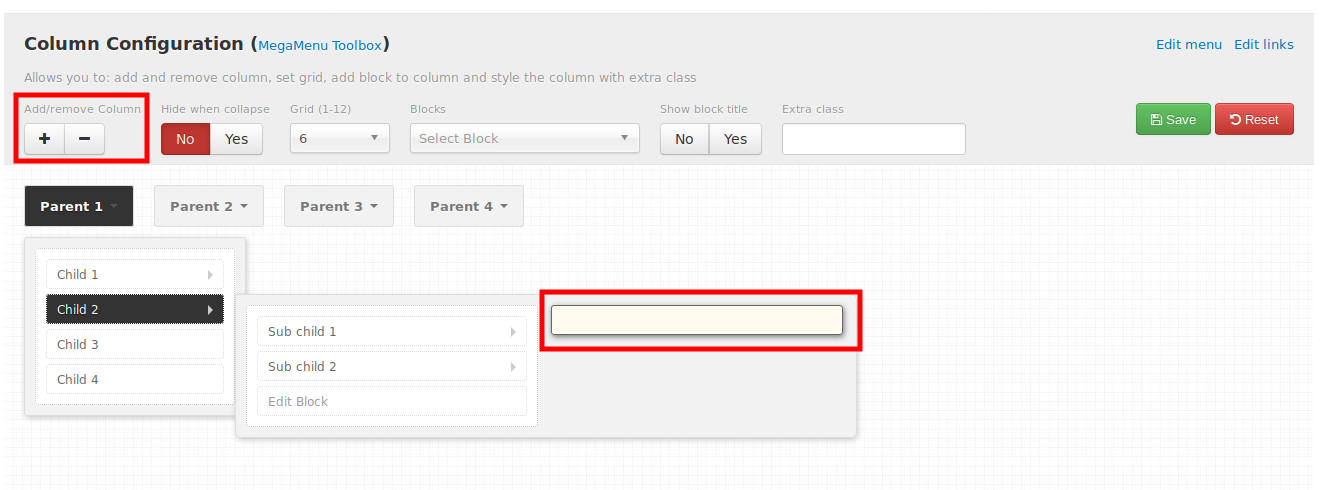
-
Now we need to add content to this block. So, like we had previously added, we can add content for the same by clicking on the Blocks option.
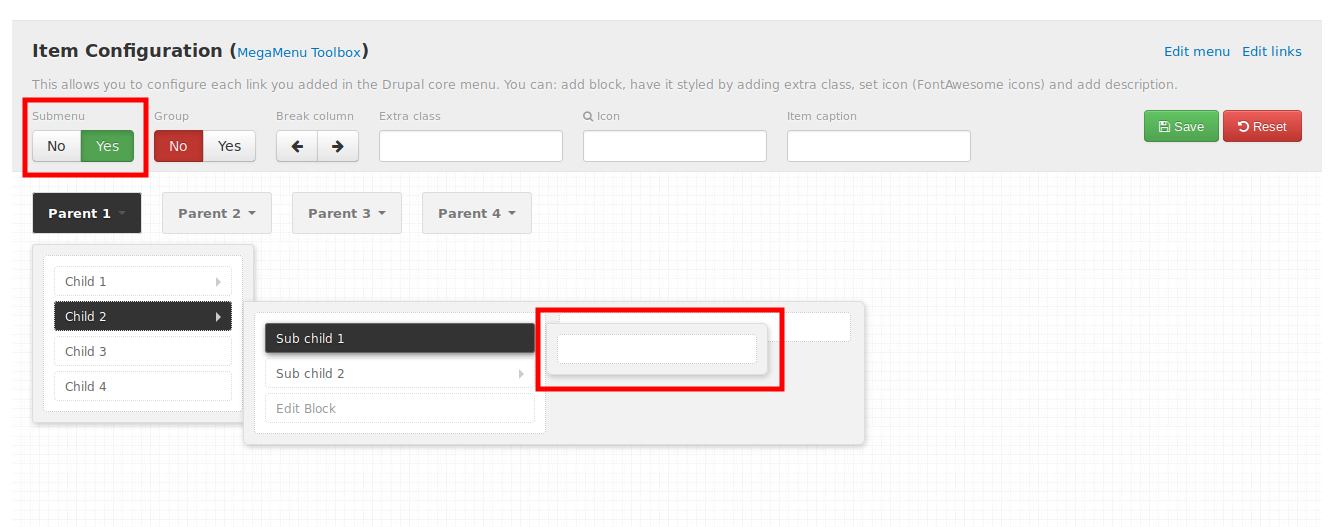
Note: the submenus may appear a bit too small. This could be easily fixed with custom CSS. For demonstration purposes, I had given a fixed width of 600 to the submenu Container.
-
To do that, select the submenu Element of the child (2) and toggle the Sub menu to Yes
-
Once the block is added it will look something like this:
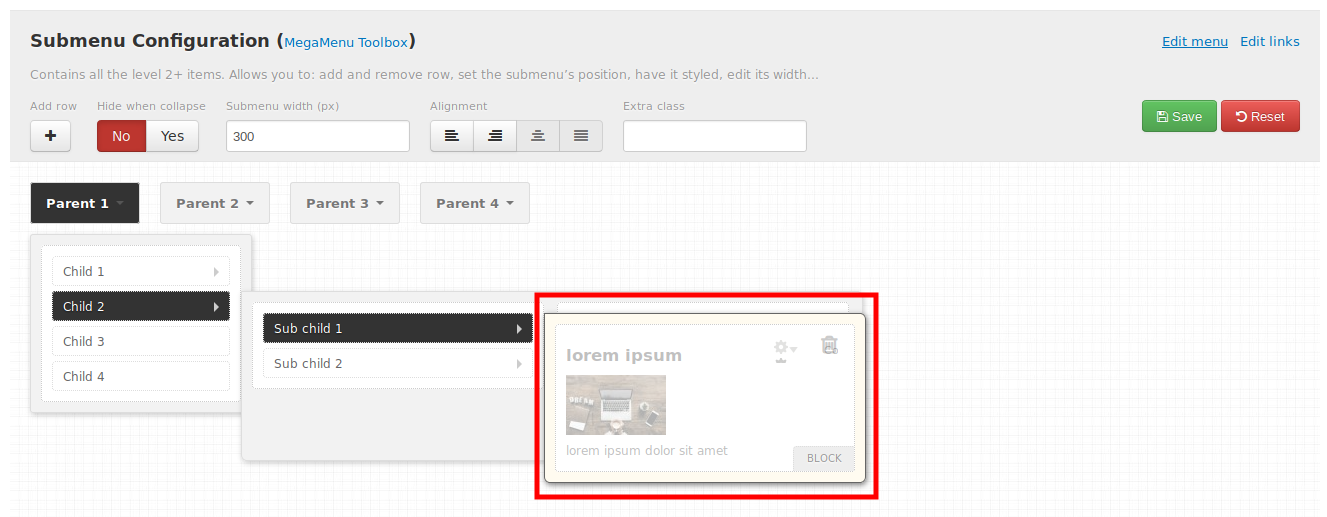
Add no content for submenu of the child (2) of Parent 2
-
Child (2) has two submenus:
-
Submenu 1 (has its own content).
-
Submenu 2 (does not have its own content).
-
-
The tricky part is the second submenu not having content. In that case, the content of the child (2) will be shown when we hover on submenu 2. But this should not be the case as hovering on submenu 2 should show empty.
-
To do this we need to place an empty block which we had created earlier
-
Doing this would mean that when we hover on the submenu then no content will be shown and it would appear empty
Once done, click on the Save button to save the configuration.
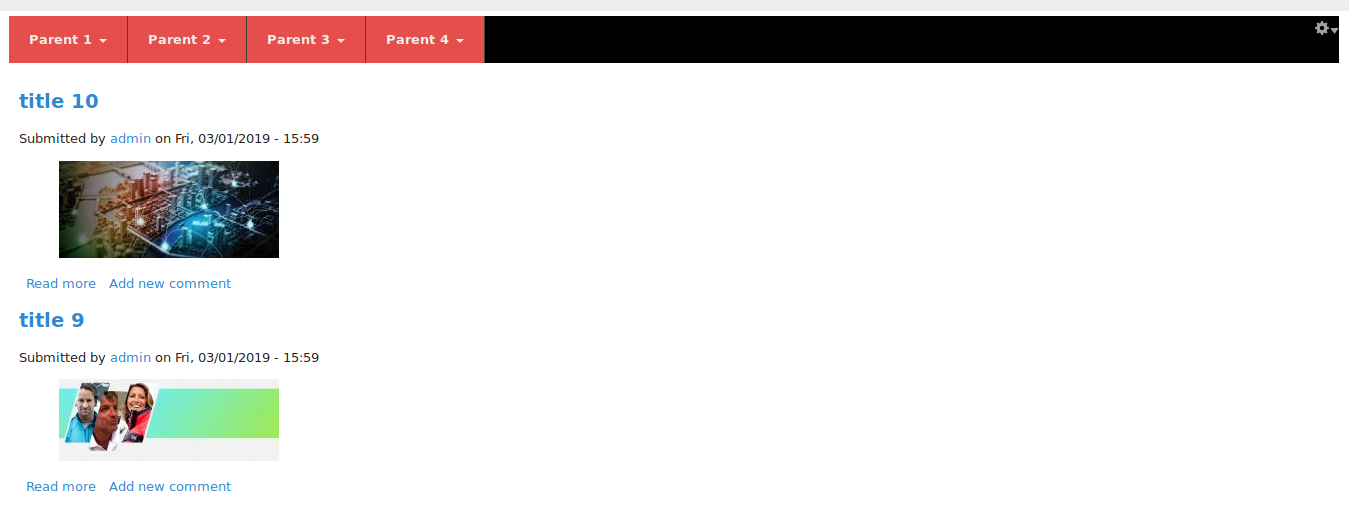
The TB mega menu that we created should look something like this:
-
With the menu looking like this:
-
The underlying menu links looking like this:
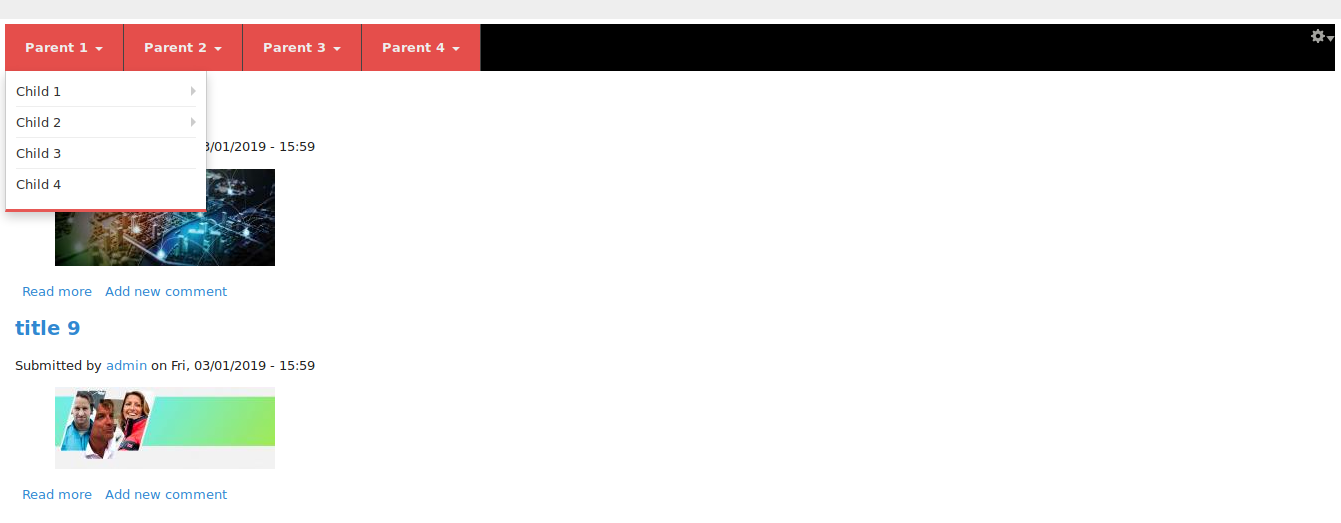
-
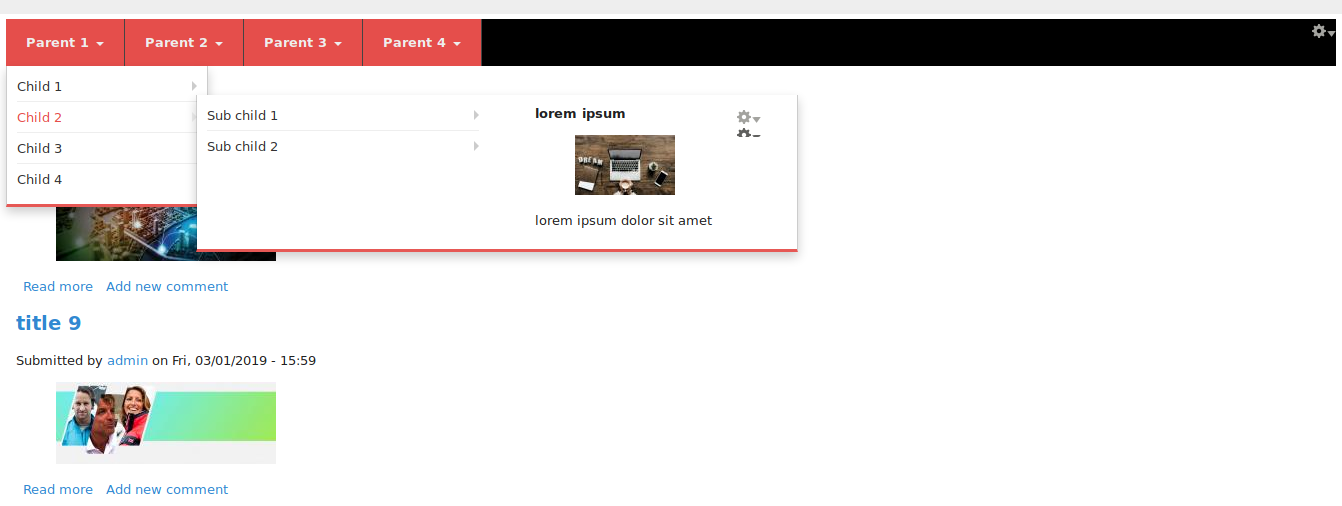
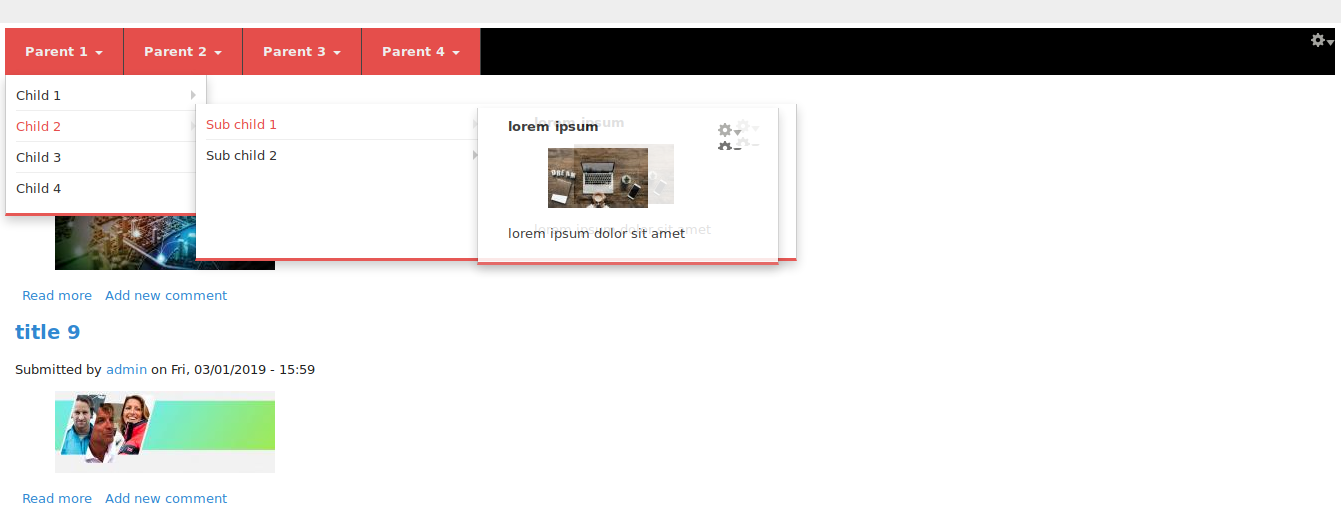
The menu links with its submenu links and contents looking like this:
-
The submenu links with its content look like this:
The blocks might appear like the ones above but with CSS this can be easily fixed and the blocks can appear in one particular place.
This TB mega menu that we have configured is essentially a block. Once done, save it. Then go to /admin/structure/block, select the TB mega menu that you configured and place it in the desired region according to your theme region. Voila! You have your TB mega menu ready!
There are some points to take note of.
-
Remember to turn on animation. It would be none initially. If an animation is not set then all the blocks that you place for the menu items will all appear at once, one on top of another.
-
Remember to provide permission to the bean block else, it will not appear for the anonymous user. To do so:
-
Go to /admin/people/permissions.
-
Search for this term your_bean_block_name block (where your bean block name is the name of your block).
-
Look for the your_bean_block_name block: View Bean.
-
Tick mark the checkbox for anonymous user.
-
Clear all cache and check the site for the anonymous user. You will have the block in the TB mega menu shown for the anonymous user.
-
You now have a completely configured TB mega menu on your site! You can add images, videos, texts quite easily now through blocks.
P.S: If you have missed out the 1st part of this blog, you can check it over here.


